# VoiceNotes- Speech to Text Online Notepad
In this post, I'll be going to demonstrate how you can built speech to text single page application using web browser speech recognition API. It has many use case like Voice Web Search, Speech Translation and many more.
## TLDR;
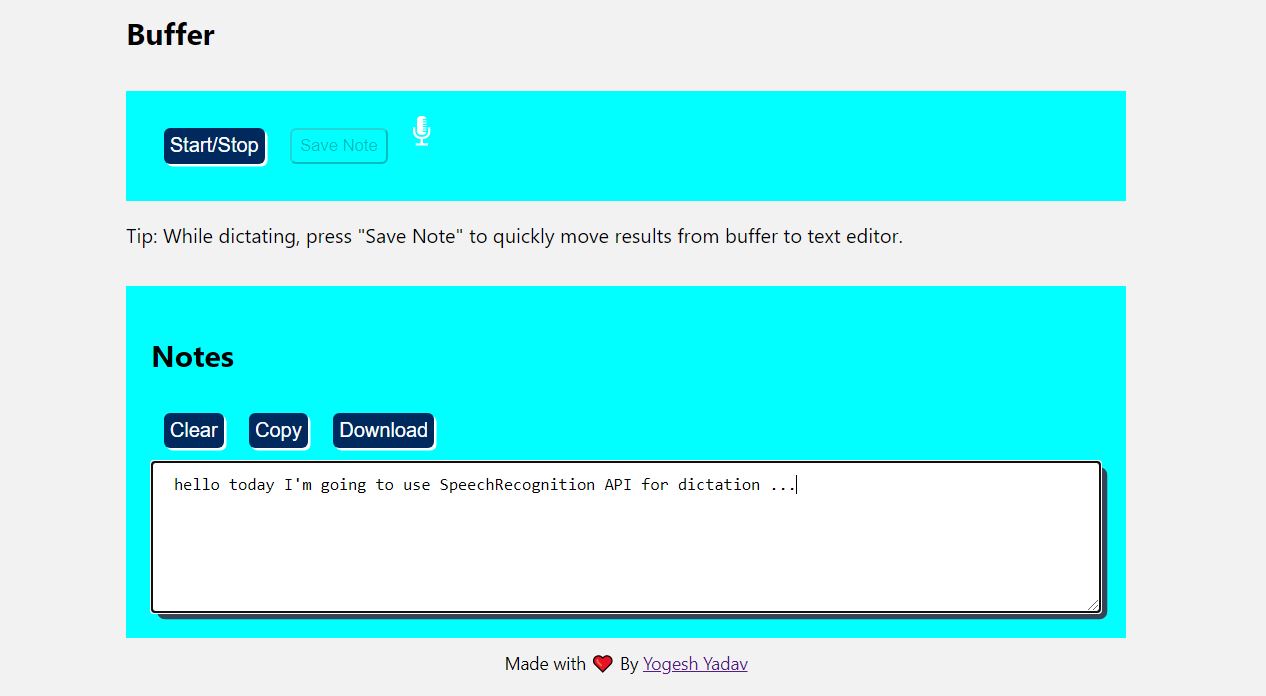
VoiceNotes is dictation app for transcribing your speech to text in real time.
Here is the demo link 👉 [dev.d3pfrhmntkwg6h.amplifyapp.com](https://dev.d3pfrhmntkwg6h.amplifyapp.com/)
Here is the repository 👉 [GitHub Repo](https://github.com/yogeshjournal/voicenotes).
#### Features
* Single-Page Application using ReactJS.
* create buffer text before writing to actual editor
* Copy text editor content to clipboard.
* download text editor content as .txt file
#### Screenshot
## Table of Content
- **[Setup speech recognition API inside React](#setup-speech-recognition-api-inside-react)**
- **[Setting up a new React app](#setting-up-a-new-react-app)**
- **[Initialize SpeechRecognition() constructor in Web Browser](#initialize-speechrecognition-constructor-in-web-browser)**
- **[Configure mic on/off and listening functionality](#configure-mic-onoff-and-listening-functionality)**
- **[Deploy to AWS Amplify](#deploy-to-aws-amplify)**
- **[Install the CLI globally with NPM](#install-the-cli-globally-with-npm)**
- **[Setup Amplify for your React.js project](#setup-amplify-for-your-reactjs-project)**
- **[Hosting a React.js site with AWS](#hosting-a-reactjs-site-with-aws)**
- **[Challenges](#challenges)**
- **[Final Thoughts](#final-thoughts)**
### Setup speech recognition API inside React
#### Setting up a new React app
```
npx create-react-app voicenotes
cd voicenotes
```
Once you've run the above you'll have a boilerplate React.js site ready to go on [localhost:3000](http://localhost:3000) You can refer to the [official docs](https://create-react-app.dev/docs/getting-started) for a better understanding of React.js as it's out-of-scope for this blog.
#### Initialize SpeechRecognition() constructor in Web Browser
The SpeechRecognition use [Web Speech API](https://developer.mozilla.org/en-US/docs/Web/API/Web_Speech_API) under the hood to control recognition service and also handles the [`SpeechRecognitionEvent`](https://developer.mozilla.org/en-US/docs/Web/API/SpeechRecognitionEvent) sent from the recognition service.
```
const SpeechRecognition =
window.SpeechRecognition || window.webkitSpeechRecognition;
const mic = new SpeechRecognition();
mic.continuous = true;
mic.interimResults = true;
mic.lang = 'en-US';
```
We have enabled property`mic.continuous=true` so that the microphone keeps on listening to the input from the user and give results for each recognition. Also we have enabled property `mic.interimResults=true` to give results that are not yet final and are still processing.
> Note — SpeechRecognition API is mostly only compatible with Chrome and Edge browsers. To see the cross browser compatibility, you can view the list from [caniuse#search=SpeechRecognition](https://caniuse.com/#search=SpeechRecognition)
#### Configure mic on/off and listening functionality
We are using two methods `mic.start()` and `mic.stop()` along with four properties `mic.onstart`, `mic.onend`, `mic.onresult`, `mic.onerror` to implement listening functionality.
```
const handleListen = () => {
if (isListening) {
mic.start();
mic.onend = () => {
console.log('continue..');
mic.start();
};
} else {
mic.stop();
mic.onend = () => {
console.log('Stopped Mic on Click');
};
}
mic.onstart = () => {
console.log('Mics on');
};
mic.onresult = (event) => {
const transcript = Array.from(event.results)
.map((result) => result[0])
.map((result) => result.transcript)
.join('');
console.log(transcript);
setNote(transcript);
mic.onerror = (event) => {
console.log(event.error);
};
};
};
```
### Deploy to AWS Amplify
Amplify is unified toolchain to create, integrate, and manage the AWS cloud services for your app. Before deploy, we have to setup and configure AWS amplify. Setting up the AWS Amplify using cli command is quick and easy! Make sure you're inside the root of your project folder before running any of the following commands.
#### Install the CLI globally with NPM
```
npm install -g @aws-amplify/cli
```
If you want to dig deeper, you can always refer to [documentation](https://docs.amplify.aws/cli/start/install#install-the-amplify-cli) by Amplify team.
#### Setup Amplify for your React.js project
Run `amplify configure` to set up the Amplify CLI to authenticate with your AWS Account which will ask your accessKey and password for secure login.
```
amplify configure
```
After that, run `amplify init` which will create a new amplify folder in the root of your project. Amplify uses this folder to store about back-end code and serverless Lambda functions.
```
amplify init
```
#### Hosting a React.js site with AWS
Manual hosting of static build to AWS is piece of cake using just one command.
```
amplify publish
```
If you want to setup custom domain, access control or see your build status, you can view by using `amplify console` command.
```
amplify console
```
### Challenges
- Implementing download button
```
const download = () => {
var l = document.createElement('a');
l.href =
'data:text/plain;charset=UTF-8,' +
document.getElementById('textarea1').value;
l.setAttribute('download', 'voicenotes.txt');
l.click();
};
```
- Implementing Copy to clipboard button
```
const copy = () => {
document.getElementById('textarea1').select();
document.execCommand('copy');
var message = document.getElementById('message');
};
```
### Final Thoughts
AWS interface had been intimidating to me because it has so many features, but [#amplifyhashnode](https://hashnode.com/n/amplifyhashnode) give me change to play around with it. In future, I want to implement rich text editor support using React Quill library for the same.
I hope you find this blog useful and learnt something new.
----
Feel free to ask in the comments or mentions me on my [Twitter.](https://twitter.com/yogesh_io)
**⚡ Happy Coding!**